
Introduction
Before we dive into the weeds of WebGPU, we must first discuss some concepts outside of WebGPU. First, is our language of choice. Throughout this series we will choose to use Rust as our main language. Why Rust I hear you cry ? What happened to Typescript ? The series is, in fact, planned to be a part of a series of series with a number of different topics involved. Those topics should involve some heavy calculations, and so we nip-it-in-the-bud now, and build our core rendering around this. Second, is a discussion of the so-called JS Event Loop; which is how the JavaScript engine in the browser processes events in the browser, and relates to how the browser will interact with our Rust code. Once we have these two topics under-our-belt, we can return to rendering and how it relates to our WebGL mental model.
Rust – Why Rust ?
Rust is a known as a language with a steep learning curve. It has a very strict structure, and ties-itself-up-in-knots. This can initially be feel very restrictive; you must carefully consider the structure of your data types; the layout of memory; and how data is used and for how long. However, this self-referential nature, and strictness of rules, brings safety and performance. When we are performing complex calculations, using vast quantities of memory and compute, we know there will be (almost) no leaks, and the execution will be as fast as our code design allows. As a recent adopter of Rust, coming from a C++ background, I appreciate that the things you are supposed to do to avoid problems in C++, are enforced in Rust, and it leads to an elegant language that is (occasionally <s>) a joy to use.
Second to this, Rust allows us to cross the browser boundary, and straddle both worlds. Rust code can be compiled to browser friendly assembly code with relative ease. Web Assembly (WASM) is a binary instruction format that is run directly in a virtual machine in the browser. It has very fast execution, somewhere between faster than JavaScript but slower than native. This allows the code to be run on any platform that has a browser that understands WASM. However, Rust has the ability to adapt to different platforms using the same code base. You can insert guards into your code that compile one set of code for one platform, and another set for the web platform. That means that any heavy computation can be scaled up using the same code base, by simply compiling it for another platform and running it natively. This will come into play for us later, as we develop the different series.
So, overall we pick Rust for two crucial reasons; its performance and safety, and it’s ability to be compiled for many different platforms using the same code. This allows us to pick-and-choose how we use it. We can have flashy demos that run in the browser, and at the same time performing grinding computation natively. If this isn’t worth the upfront penalty of learning it; I don’t know what is.
The JS Event Loop
As discussed above the Rust code will be compiled and run by the browser using WASM. This runs in a separate virtual machine that runs inside the browser, which interprets and runs the assembly. Currently, WASM has no access to the DOM, and so cannot directly interact/manipulate the web frontend itself. Instead, we must communicate with the JS Event Loop directly. This loop is responsible for running any JS tasks within the browser, and provide DOM updates. We must therefore understand it, so that we can correctly communicate with it, and update our site. For our purposes, rendering graphics, this communication will be limited to; initialisation, and interaction with event listeners on the front end.
Here is a basic diagram of the JS Event Loop system:
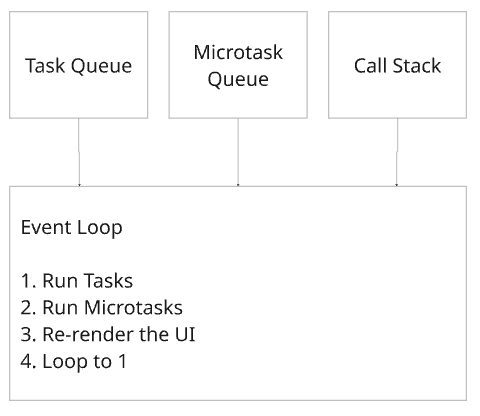
There are several different terms that we need to define here:
- Task – These are setTimeout, setInterval calls, and DOM events
- Microtask – These are promises and mutation observers.
- Call Stack – The current stack of functions to call.
The event loop starts by adding a tasks to parse the script. As the script is being evaluated, any functions calls are added to the call stack. If the evaluation encounters a task (setTimeout, etc.) the function call is added to the task queue; similary for microtasks (promises/mutation observers). Once the first task, the evaluation, is done, it proceeds to step 2: microtasks. This steps picks the oldest microtask, and adds it to the call stack. The call stack is process, any internal functions to the original function are added, and evaluated, as you would expect. As soon as the call stack is empty, it reaches step 3, where the updated DOM is rendered to the screen. Finally, it loops to step 1, where the oldest task is added to the call stack, and the process starts again. This sums up the JS event loop. If you want to explore more there is a good tool here: https://www.jsv9000.app/
Conclusion
In this part, we look at the choice of language going forward, and the JS Event Loop. We frame Rust as a strong language that enforces good practice, and provides the performance we need as a result. It also allows us to straddle both the web world, and the world of native executables with relative ease. Following from that, we describe the JS Event Loop in brief, which will allows us later to communicate between the site and the WASM code.
In the next part, WebGPU – Part 3: Application, we describe the outline of our application that bridges the site’s canvas to the WASM code.